This assignment is divided into two parts, and will build further upon the cloud application you created in home assignment 1. The goal of this homework is to make you familiar with with Platform-as-a-Serivce (PaaS) and how it differs from Infrastructure-as-a-Service (IaaS), which you worked with in homework 1.
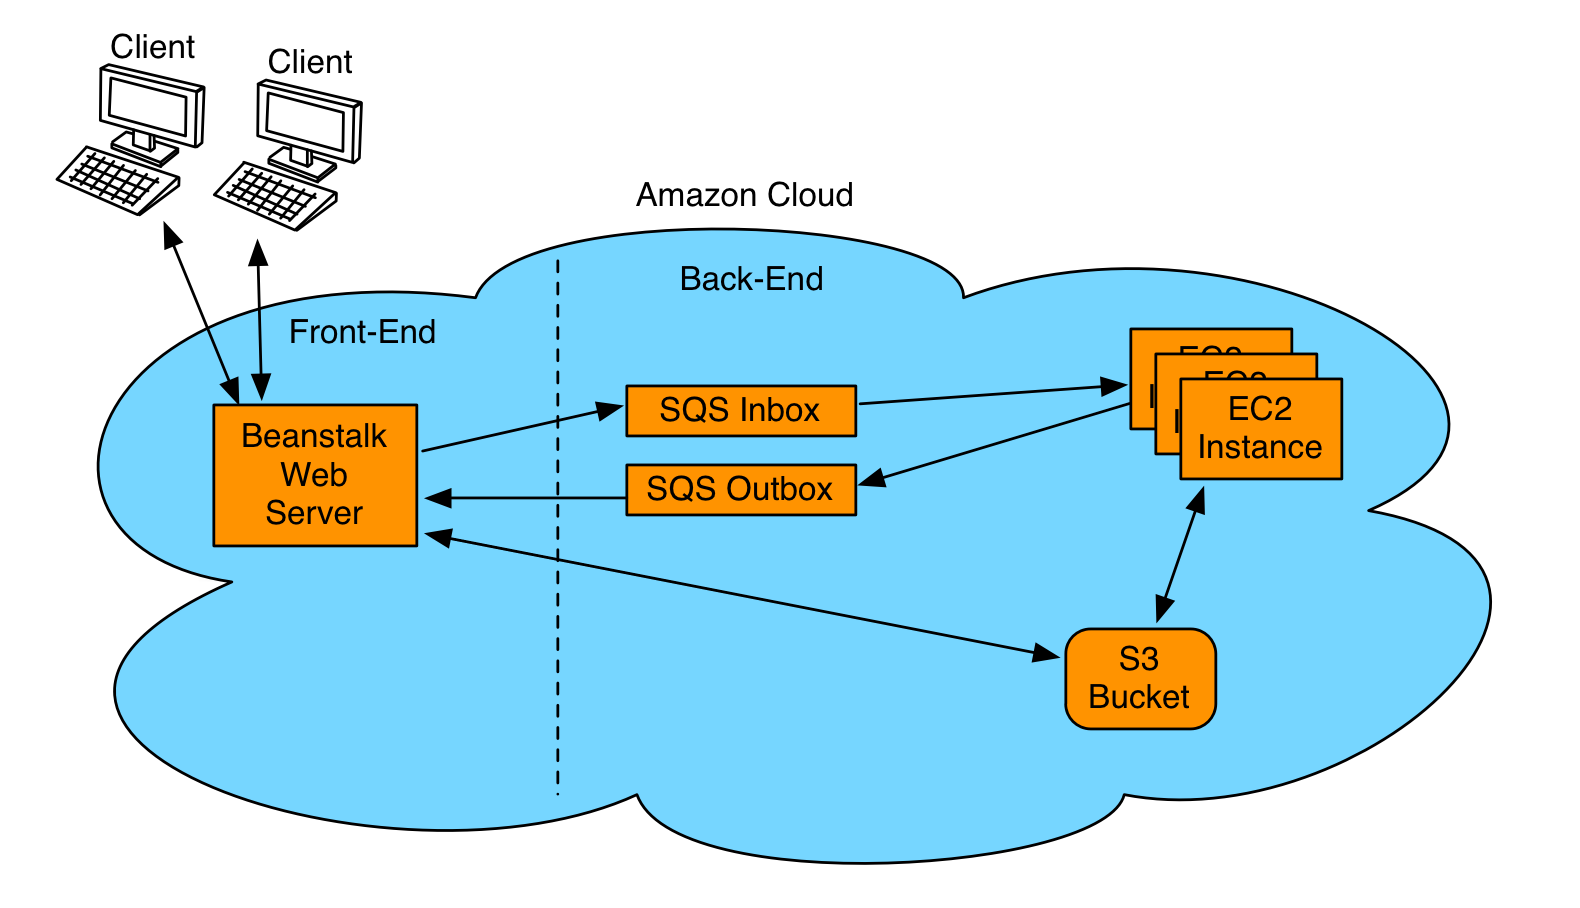
You will extend the cloud application by adding a web server, so that the clients can access it through their browsers (part 1). Then you will make it elastic and scalable by creating auto scaling and load balancing for both the back-end and the front-end of your cloud application (part 2). The back-end consists of the SQS-queues, the S3-bucket and the EC2Instances (= what you did in homework 1) and the front-end is what you will develop in this homework.
The PaaS that you will work with during this homework is the Amazon Beanstalk.
Once again there are various ways to do this homework. Amazon Beanstalk supports Java, .NET, PHP, Python, Ruby, and Docker. However, I will only give details on how to do it using Eclipse, Java (.jsp), and Apache Tomcat. But please, feel free to do it in whatever way you wish, as long as you meet the requirements.
The deadline for this homework is the session 3 (3/3). Before then you should hand in:
Part 1 of this homework will focus on creating a web server for the cloud application, so that users/clients can access it from their web browsers. The Web Server will replace the Client in the previous homework. Therefore most of the code developed for the Client in homework 1 can be reused. The new structure for the cloud application can be seen below:
The requirements for the web-server is as follows:
Again the available processes should be:
Remember that you might now serve several users simultaneously, and therefore it will be extra important that you figured out a clever way to relate the correct user-request with the correct response in the previous homework. Also, there is no need for a fancy GUI here, some good ole’ fashioned text boxes will do just fine..
To make the testing and development easier, and faster, I suggest that you make it possible to have a local host on your computer. Thus you can test your web server locally before you upload it to Amazon Beanstalk, much like how you tested the EC2Instance-Code locally in the homework 1. When running on a local host-server you will still be able to connect to the back-end of your cloud application.
java.jspNow that you have your brand new cloud application up and running you need to do something to meet the extreme user demands it will face once it becomes the new killer app! Luckily this is easy, you just have to create auto scaling for your EC2Instances and load balancing and auto scaling for your web server. Some useful links for this can be found below.
Auto Scaling -> Launch Configurations
Auto Scaling -> Auto Scaling Group
Scaling:
Some useful links for part 2: