For this assignment, you will build a basic application using Amazon’s cloud services. You will become familiar with how to launch and access virtual machines using EC2, and learn how to execute code on these machines. You will learn how to use Amazon’s Simple Queue Service (SQS), as well as Amazon’s Simple Storage Service (S3).
There are several ways of doing this assignment, including a variety of languages you can use, and a variety of ways of interacting with AWS. For example, in order to interact with AWS, you can use the AWS management console, command-line tools, SOAP APIs, REST APIs, as well as libraries in other languages. However, I will only provide nice detailed instructions on how to do this assignment in one particular way (you are welcome to do it another way, but I will be unable to help you along the way if you run into issues). Specifically, I will give guidance on how to use the AWS management console to create AWS resources, and how to use the AWS SDK for Java to interact with these resources (both from within AWS, and outside of AWS).
In order to do the assignment in the way I will outline, which uses the AWS management console for various purposes, you will have to set up an AWS account. To set up an account, you will have to provide a credit card number, but this credit card will not be charged because everything we will do in this assignment falls under the “Free Usage Tier” of AWS . However, if you wish to do some of the tutorials provided by AWS, or test some of their example code, you might end up being charged.
For a great overview of some best practices for using the Amazon Web Services I reccomend this white paper.
Note! Do not make any of your AWS keys, credentials, or even keys to your S3-buckets publicly available (e.g. GitHub), or you might end up with a juicy bill.
The deadline for the homework is until the next session (24/2). Before then you should hand in a zip-file containing your workspace, and the log/text-files from your S3-bucket. You hand it in by mailing the zip-file to the TA (Victor Millnert, victor@control.lth.se).
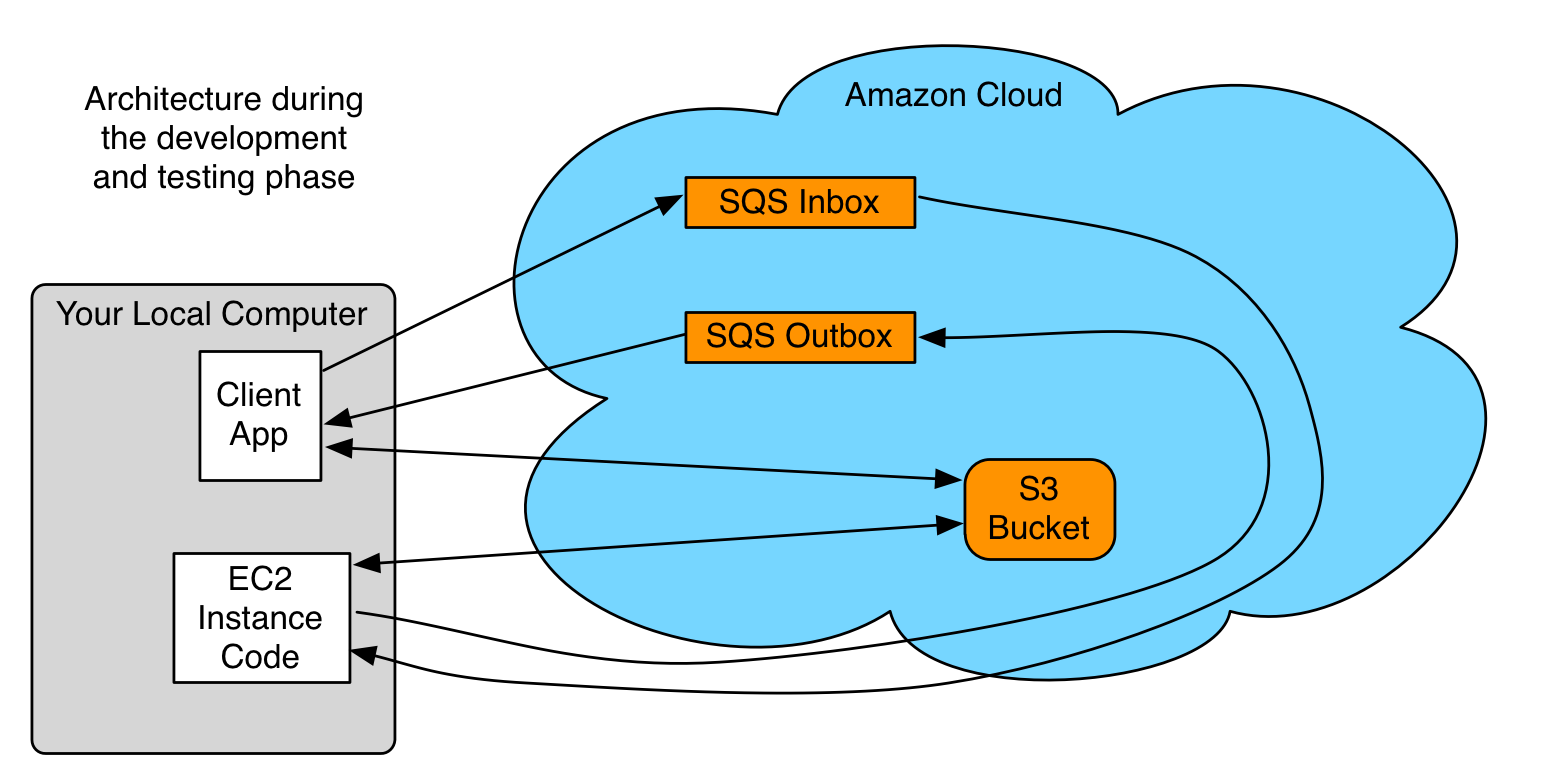
The recommended structure during the development phase of this assignment is shown below. Note how the code that is later to be run on your EC2Instance is run on you local computer during this development phase (saves a lot of time). Once everything is working, this will be moved to it’s own EC2Instance.
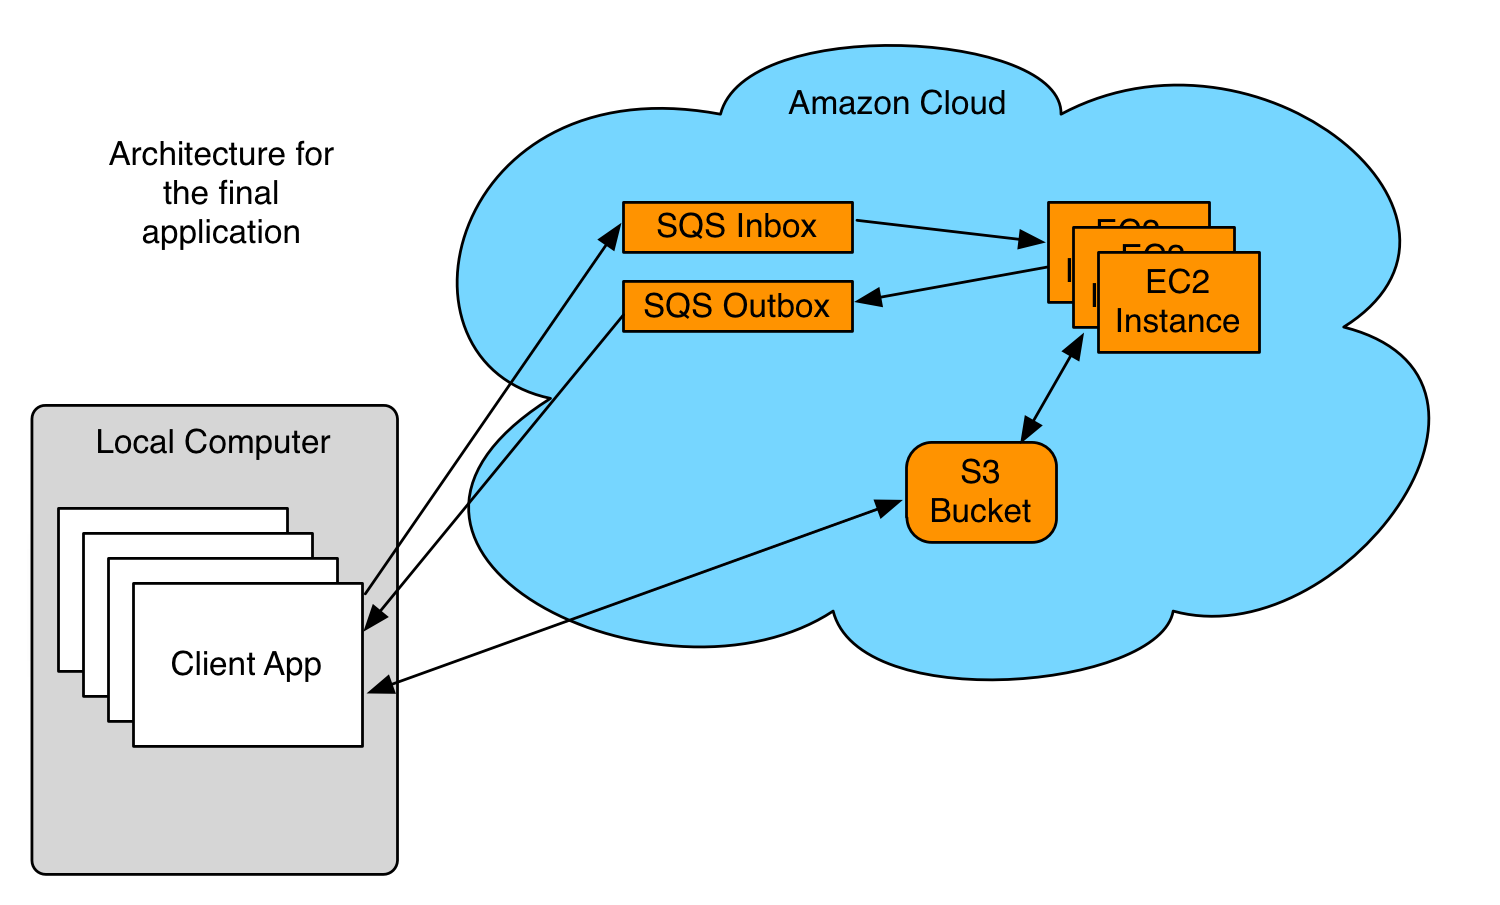
Once all the code is working as intended the EC2Instance Code can be moved to the Amazon Cloud, and the final structure will look like the following:
For a more thorough description of the application you can read this nice article by Amazon.
ssh into your new EC2Instance/.aws/ directory to store your credentials in
sudo mkdir /root/.aws//home/ec2-user/ (these credentials were created during step 3.)/home/ec2-user/ to /root/.aws//home/ec2-user/sudo java -jar RunnableJAR-file.jar/etc/rc.local using an editor of your choice (perhaps vi)touch /var/lock/subsys/local add the following line:
java -jar /home/ec2-user/RunnableJAR-file.jar &Actions -> Image -> CreateAction -> Launchssh into your EC2Instance, modify it a little bit and then save it as an AMI-image.If you don’t like Eclipse I’m sure you can find another way..
The final structure of the application is shown again, for reference when describing the requirements of the different parts in some more depth.
Runs locally on your machine. Should do the following:
The available processes should be:
Note: You need some clever way to make sure that the result in the SQS-outbox is indeed the result to your request and not the request made by a different client app (meaning it should be possible to have several client apps).
You will need one “inbox” where the requests will be put and one “outbox” for the responses.
Some notes on the SQS-queue:
// Queue Attributes
Map queueAttributes = new HashMap();
queueAttributes.put("ReceiveMessageWaitTimeSeconds", "20");
queueAttributes.put("VisibilityTimeout", "10");

/*
* Create an Inbox and an Outbox Queue
*   - Enable SQS Long Polling. Forces the component that tries to receive a massage to wait.
*   - Set the Visibility Timeout. Ensures that only the intended can receive the message during
*   the timeout.
*/
System.out.println("Creating a SQS-inbox.\n");
CreateQueueRequest createInboxQueueRequest = new CreateQueueRequest("Inbox");
String inboxUrl = sqs.createQueue(createInboxQueueRequest.withAttributes(queueAttributes)).getQueueUrl();
Should be run on your local computer during the development phase, and then (once it works) moved to the Amazon Cloud. These instances read from the “inbox” queue, process the requests, put the processed object in S3 bucket, send a response message to the “outbox”-queue, and delete the message from the “inbox”-queue once they have finished processing it.
To create an EC2 Instance from a certain AMI you can do as below:
AWSCredentials credentials = null;
try {
    credentials = new ProfileCredentialsProvider("YourCredentialsName").getCredentials();
} catch (Exception e) {
    throw new AmazonClientException(
            "Cannot load the credentials from the credential profiles file. " +
            "Please make sure that your credentials file is at the correct " +
            "location (/Users/Username/.aws/credentials), and is in valid format.",
            e);
}

// Create an EC2Client
AmazonEC2 ec2 = new AmazonEC2Client(credentials);
ec2.setEndpoint("ec2.eu-central-1.amazonaws.com"); // It is better to use 'setEndpoint()' than 'setRegion'

RunInstancesRequest runInstancesRequest = new RunInstancesRequest();

// AMI for normal Linux EC2Instance (setRegion Frankfurt): ami-b43503a9
runInstancesRequest.withImageId("ami-b43503a9")
               .withInstanceType("t2.micro") // Select t2.micro to be eligible for free tier
                   .withMinCount(1)
                   .withMaxCount(1)
                   .withKeyName("YourKeyName") // Which you will use to ssh into your instance
                   .withSecurityGroups("YourSecurityGroup");

RunInstancesResult runInstancesResult = ec2.runInstances(runInstancesRequest);
The S3 bucket will contain all of the requests/responses which the system has processed. This information should at least include: MessageID, timestamp, the three numbers, process, result (if it’s a result)
Some good info on the S3-bucket can be found here.
Note that all S3-buckets need unique names!
To create a S3-bucket the following code can be used:
String bucketName = "your-special-bucket-" + UUID.randomUUID();

/*
 * Create a new S3 bucket - Amazon S3 bucket names are globally unique,
 * so once a bucket name has been taken by any user, you can't create
 * another bucket with that same name.
 *
 * You can optionally specify a location for your bucket if you want to
 * keep your data closer to your applications or users.
 */
System.out.println("Creating bucket " + bucketName + "\n");
s3.createBucket(bucketName);